
This Campaign type is available on the Movement Builder plan tier and above.
Do you need a campaign type that brings your causes to the public eye? Our Letter to Editor Campaign lets your supporters generate a list of nearby publications based on their address, making it easy to raise awareness and advocate for your issues!
This article will go through the step-by-step process of creating this Campaign type.
As always, you'll want to begin by selecting the Create Campaign button on your organizations dashboard. You'll then be directed to a page where you'll have three form types to choose from.
You will want to choose the Letter to Editor option, and fill in the remaining details as they fit your Campaign. Select Create Campaign and the configuration of your Letter to Editor Campaign will begin!

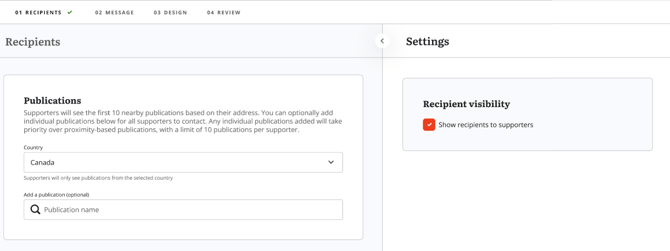
1. Recipients
This is the first step in the configuration process of your Campaign. You'll first be asked to choose what country your Campaign is going to be based in (we currently support Letter to Editor Campaigns in the USA & Canada). Once you have chosen your country, the publications for that country will be selected, and your Recipients will now be set for targeting.
The 10 closest publications to your supporter's input address will be targeted upon submission.
You also have the option to add static publication recipients, which means you can include publications that will be added to every submission regardless of the supporter's location. Note that the recipient limit for a submission is 10, so if you add 3 static publications, only 7 will be generated based on the supporter's input location.
Depending on the strategy of your campaign, you may (or may not) want supporters to see the publications that they are targeting. You can determine if these recipients appear on the live form by selecting, or deselecting, the "Show targets to supporters" checkbox on the right-hand side of the screen.
Save your changes and you'll be prompted to move to the next step of your Campaign creation!
2. Message
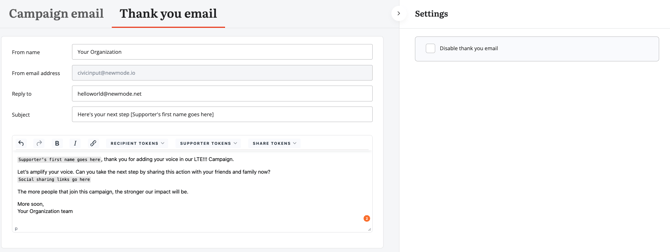
In this step, you'll add content to the placeholder letter for your supporters. Since originality is key for Letters to the Editor, we recommend keeping the prompted text within this field. Including campaign-specific talking points will help supporters write personalized and effective letters. Our Message page provides a boilerplate example to guide you in structuring this content.
On the right-hand side of the letter content settings, you should see a toggle option labelled "Submission Approvals". This is a feature that allows you to manually approve incoming submissions so you can review them as necessary. We recommend manually approving submissions when running a Letter to Editor Campaign, as ensuring nothing inappropriate is going through your form is paramount to the success of your Campaign.

You'll also see a secondary tab, labelled "Thank you email". Here, you can write a thank-you email to your supporters for taking action on your campaign. You can also opt to turn off the thank-you email, if you'd prefer your supporters not to receive any further correspondence.
3. Design
The design step of your Letter to Editor Campaign is where you are going to structure the layout of your form. Include things such as:
- The title of your Campaign
- A banner image to make your form more inviting.
- Introductory text to provide your supporters more context behind the Campaign you are running.
- Different themes, to match your own organization's styling.
- Additional features, such as an activity stream, social sharing options etc. (preferably used on your thank-you page, see below).

You'll also note that there is a thank-you page tab, which will allow you to style a thank-you page supporters will be directed to when they have successfully submitted on your form.

Save your changes, and you'll be on the final step of your Campaign's configuration, the Review stage!
Review
This is the final stage of your Campaign's creation! It is split up into a number of different sections, which I have broken down below:
- Campaign URL -
- This is where you will determine if you would like to host your campaign using a New/Mode based URL, or if you would like to embed the form on your organization's own website!

- This is where you will determine if you would like to host your campaign using a New/Mode based URL, or if you would like to embed the form on your organization's own website!
- Test emails -
- You'll be able to ensure that your letters are being received to your intended recipients as expected by sending yourself a test submission. Simply input the email address you'd like to receive a test email to, and a copy of your letter will be sent to that address exactly as it will to your recipients.

- You'll be able to ensure that your letters are being received to your intended recipients as expected by sending yourself a test submission. Simply input the email address you'd like to receive a test email to, and a copy of your letter will be sent to that address exactly as it will to your recipients.
- Social sharing -
- This section is where you will include your Campaign's URL and our system will generate social sharing buttons that can be used on your thank-you emails and pages. This will help with spreading your form across social media, in turn, gaining more traction for your Campaign!

- This section is where you will include your Campaign's URL and our system will generate social sharing buttons that can be used on your thank-you emails and pages. This will help with spreading your form across social media, in turn, gaining more traction for your Campaign!
- Preview -
- On the right-hand side of the screen, you'll see a "Preview" section, which will allow you to review your form and how it will look once you have launched it to your supporters. You will find that there are multiple tabs within the preview section, that allow you to review all publicly facing aspects of your form, so you can be sure that everything is appearing as expected!

- On the right-hand side of the screen, you'll see a "Preview" section, which will allow you to review your form and how it will look once you have launched it to your supporters. You will find that there are multiple tabs within the preview section, that allow you to review all publicly facing aspects of your form, so you can be sure that everything is appearing as expected!
After you have reviewed everything and are happy that your configuration is set up to your Campaign's standards, it's time to launch your campaign. At the bottom right hand of the New/Mode page, you'll see the "Launch Campaign" button. Select this and your form is now ready to contact your intended recipients!

Once you have launched, you will be brought to a page congratulating you on your Campaign launch! This page provides you with a link to your form, and a "Campaign Overview" button, which will bring you to the configuration summary of your Campaign. You can make changes as you see fit even after launching, but keep in mind, these changes will be made in a live state and will immediately update the form that you have shared to your supporters.
