Publish a CSV to the web and use it for New/Mode custom targeting
Custom targetting allows your supporters to contact decision-makers who are not included in New/Mode's location-based datasets. Using a Custom Spreadsheet allows you to easily upload a large list of targets, or, have users select targets from a dropdown menu by categories such as name, jurisdiction, and party.
Create your CSV and Publish to Web
Create your CSV and Publish to Web
Here's how to use a CSV spreadsheet to upload custom target data:
1. Make a copy of this Google Sheet Template and save it to your Google Drive.

2. Fill out the names and at least one piece of contact information for the targets you want your supporters to contact.
- Keep the columns where they are!
- Fill the 'jurisdiction' and 'full_name' columns along with one piece of contact information depending on the type of action:
- fill out the email column for an email action, the phone column for a call action, the Twitter column for a Twitter action, and the fax column for a fax action.
- You can leave columns that you won't need blank, just don't delete them!
- For a Twitter action, add only the target handles in the Twitter column instead of the whole URL of their Twitter profile.
- If your supporters will have to select their jurisdiction, riding, or ward and there are more than 9 of them on your CSV file, add a space before the single digits (so "Ward 1" instead of "Ward 1" for wards 1-9). This will ensure that they're displayed in the correct order.
3. (Optional) Add additional columns for lookup values that your supporters can search to see targets most relevant to them.
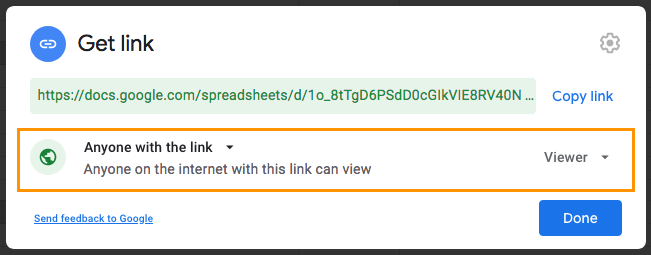
4. Click on the Share button on the top right, and set the sheet so that 'Anyone with the link' can view it.
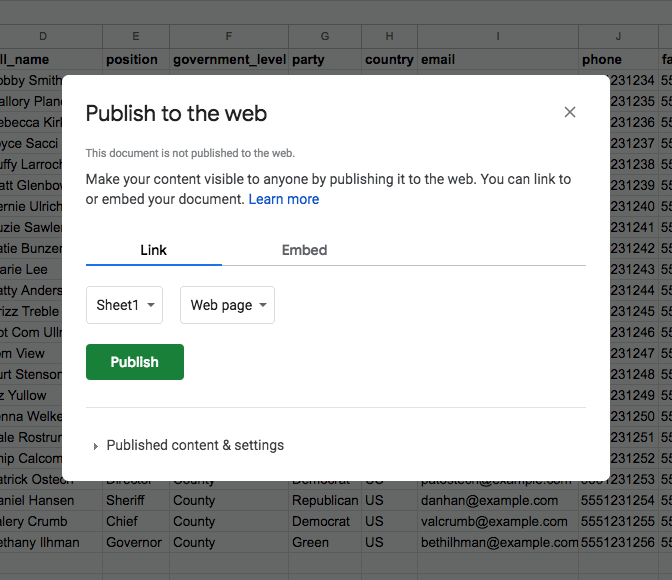
5. Click on File on the top bar menu, then Share, and open Publish to Web. Select your sheet and Comma-separated values (.csv) on the Publish to Web form before clicking the Publish button. Copy the provided link and you're on your way!
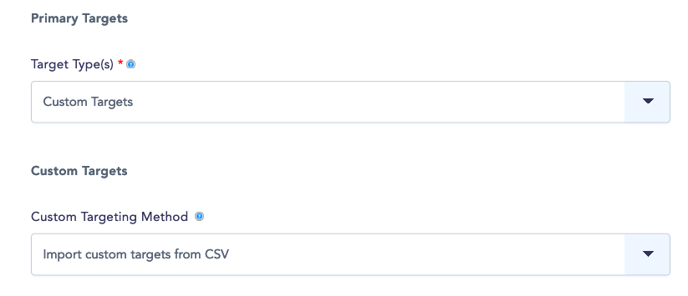
6. Return to the Primary Targets section of your action's Basic Configuration page,and set its Target Type to "Custom Targets" and its Custom Targeting Method to "Import custom targets from CSV":
7. Paste the link that you copied from Google Sheets into the "URL for Custom CSV Data Source" field.
 8. After pasting the link, click outside the field to import the CSV.
If you receive an error message after importing your CSV file, ensure that all necessary columns are filled out (Name, Jurisdiction, and either Email, Phone, Fax, or Twitter), and that you have copied the Published Web URL, not the standard webpage URL.
9. Define the settings for your custom targets:
Automatically Update CSV Checkbox
Check this box after adding a new CSV or if you make any changes to a CSV sheet that's already linked. This ensures that the latest version of the CSV is reimported right away when you click the 'Save' button on the Basic Configuration page.
![]()
If you don't check this box our system will still check the CSV for any updates but it may take up to 24 hours to do so.
Options
- Provide a Search Bar: The display of this option depends on how many columns you choose in the Search By field.
- If multiple columns are chosen, we will automatically create a search bar on your action that allows your supporters you search based on the lookup values you've included in your CSV.
- If only one column is chosen, the search bar will include a dropdown, so your supporters can scroll through the values in that column of your CSV. We highly recommend using this option. - Display All Results: This option will create a list of all the contacts in your CSV on the action. This might be useful if you just have a few targets in there, but don't use it for a long list!
Search By
This is a list of the lookup columns that you created in your spreadsheet. Select the ones that you would like your supporters to be able to search by. For example, "jurisdiction," "last name," or "university."
In the action, supporters will now see a search bar (or a dropdown, if only one column was selected) that allows them to look up their representatives or relevant organization/institution.
8. Click Save & Next, then go to the View tab to see your new Search bar or dropdown on the action.
In the future, any changes that you make to your CSV data will automatically update to your action within 24 hours (if you want changes to be reflected immediately, tick the Automatically Update CSV checkbox and Save your Basic Configuration page), so once you're done setting this up, you can control lists of targets and target data from the published spreadsheet. Easy peasy!
Last updated: September 5, 2023