You can see how your supporters arrived at your action by sharing it through links that have a tracking element in them. Read on to learn how to set up those links and use them to find out where each supporter found your action.
Set up a source tracking component
Supporters coming from different partner organizations
Supporters coming from different social networks
Supporters coming from a conference
Passing an Activist Code ID or Source Code to EveryAction: Constant Value method, Hidden Component method
This feature is available on the Campaign Builder, Organization, and Network plans.
Overview
There are a few parts to this process, so let's start with a general idea of how tracking the source of a submission works.
1. Define the question you're trying to answer by tracking the source of your submissions. A few common ones are:
- Which one of the organizations we're partnering with for this campaign is bringing in the most supporters?
- How are our supporters finding our action? Is it mostly via email, Facebook, Twitter, Instagram, YouTube, or something else?
- How many supporters will find our action through this conference?
2. With a clear idea of what you're trying to find out, add a tracking component to your action and give it a short and descriptive name, such as source_code or source.
3. When your action is live, instead of sharing a single URL with all of your supporters give each group of supporters a different link depending on the question you're looking to answer. (The example below uses 1, 2, and 3 as options, but those can be codes for different partner organizations, different social networks, or anything else you're looking to track).
- Some supporters receive this link: www.yourcampaign.com/action?source=1
- Others receive www.yourcampaign.com/action?source=2
- And a third group receives www.yourcampaign.com/action?source=3
4. Supporters from all groups engage with your action! When they submit, we record which link they used and that let's you understand which group they were in.
5. Now you can export the submission data from your action to see where each submission came from, uncover patterns, and answer your question from the first step.
The rest of this guide will focus mainly on step 2 (setting up the tracking component on your action), go into a bit more detail on step 3 (sharing those tracking-ready links in different scenarios), and finally cover step 5 (reviewing your findings).
Setting up a source tracking component
Get your action ready to start understanding how your supporters arrive to it.
Create a source tracking component
1. On the Edit tab of your action, open Advanced > Components.

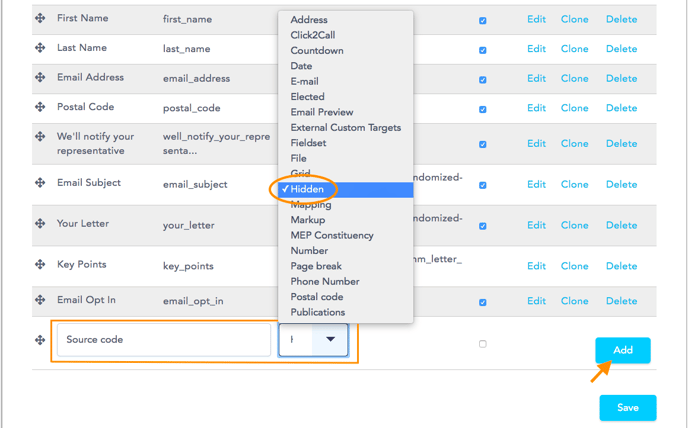
2. Once on the Components page, you should see a blank component field: this is where you'll create your tracking component. Name it what you'd like, select Hidden from the type drop-down menu, and click the 'Add' button.

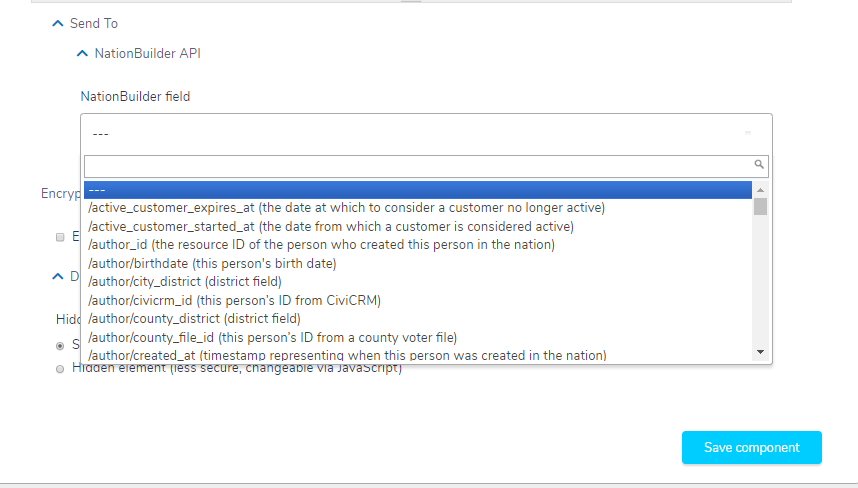
3. If the action is connected to a CRM, scroll to the 'Send To' section of the same page, and choose the field in your CRM that you'd like this tracking information to be synced to.
(If you don't want this data sent to a CRM, you can skip this step!)
4. At the end of the page, under 'Hidden type', make sure that the component is set to 'Hidden element'.

5. Save the changes.
Define the component's value and an optional default value
6. Open Advanced > Components to return to the list of components. Once there, take note of the second piece of information for your new component, which is the component's form key:

7. Next, click on 'Edit' to make one last change to your new component.
8. On the next page, find the 'Default value' field, and paste this token into it:
[current-page:query:your_parameter]
9. Replace the 'your_parameter' part with the form key from step 6.
The match needs to be exact! Be very careful to keep everything lower case, include any underscores ('_'), and not introduce any spaces.
In this example the form key is 'source_code', which you can see at the end of the token below:

(Optional) You can set a value to be recorded by default when there's no data for the parameter you defined earlier.
In that case, use [current-page:query-with-default:your_parameter:your_default_value] as the value for your component instead of the token shown earlier:
- replacing 'your_parameter' with the form key describing what you want to track, and
- replacing 'your_default_value' with the word you want recorded by default in cases when there isn't any tracked data.
Following the example from the previous screenshots, the parameter will be "source_code" and we'll set up the default value to be "other":

10. Click the 'Save component' button to complete the process.
11. Repeat steps 1-5 if you want to track more parameters!
A note on using multiple parameters
After testing a link with a single parameter, if you then add more parameters to the URL and open the link again you may see that the new parameters aren't there by the time the page loads.
This is likely because your browser cached the original link, so try opening the new link in a different browser or in a private browser window.
Start tracking!
Now that you've set up a tracking component, you can add the parameter you defined on step 2 to your links to start understanding where the submissions are coming from. We'll look at the three questions mentioned in the Overwiew as examples of how you can use this tracking method, but the sky is the limit!
Partner organizations
Which one of the organizations we're partnering with for this campaign is bringing in the most supporters?
In this example, we've partnered with a few organizations who'll be pointing their supporters to our action, and we want to understand which organization each supporter came from.
1. We'll come up with a few short words (you can think of them as codes) to identify each organization: org1 for the first organization, org2 for the second one, and org3 for the last one. (Abbreviations of each organization's name are great for this!)
2. Next we'll use the organization codes we just chose to create custom links for each organization we're working with. The recipe for this is:
Our Campaign URL + ? + Tracking Component Name + = + Organization Code
So for the first organization, we take our campaign URL (www.changetheworld.org/takeaction) and add the other ingredients to make it a tracking-ready link:
www.changetheworld.org/takeaction?source_code=org1
We then repeat the process to create custom links for the other two organizations we're working with, so that the custom URL for the second organizaion ends in org2 and the custom URL for the third organization ends in org3.
3. Now that we have one custom tracking link for each of our partner organizations, it's time to pass on a different link to each organization for them to share with their supporters:
- We'll give this URL to the first partner organization:
www.changetheworld.org/take-action?source_code=org1 - This URL to the second partner organization:
www.changetheworld.org/take-action?source_code=org2 - And this other URL to the third organization we're partnering with: www.changetheworld.org/take-action?source_code=org3
When someone arrives at our action using one of those links, their submission data will include that source code ('org1', 'org2', or 'org3'). And, if we set up an default value in steps 6-10, any submissions that didn't come through any of the links above will have their source code recorded as "other".
Social Networks
How are our supporters finding our action? Is it mostly via email, Facebook, Twitter, Instagram, YouTube, or something else?
We want to be where our supporters are but posting everywhere takes a lot of work, so we want to you find out where our campaigns do best to allow us to focus our efforts accordingly.
1. We'll come up with a few short words (you can think of them as codes) to identify each social network: fb for Facebook, tw for Twitter, and ig for Instagram.
2. Next we'll use the social network codes we just chose to create custom links for each social network we're posting on. The recipe for this is:
Our Campaign URL + ? + Tracking Component Name + = + Social Network Code
Following the recipe, for the first social network we take our campaign URL (www.changetheworld.org/takeaction) and add the other ingredients to make it a tracking-ready link:
www.changetheworld.org/takeaction?source_code=fb
We then repeat the process to create custom links for the other two social networks we're posting on, so that the custom URL for Twitter ends in tw and the custom URL for Instagram ends in ig.
3. Now that we have one custom tracking link for each of the social networks, it's time to include a different link with our social media posts depending on the social network:
- Our Facebook post will have this link:
www.changetheworld.org/take-action?source_code=fb - Our Twitter post will link to:
www.changetheworld.org/take-action?source_code=tw - And our post on Instagram will link to:
www.changetheworld.org/take-action?source_code=ig
Conference or Event
How many supporters will find our action through this conference?
A couple of folks from our organization will give a talk at a major conference and will be amplifying our latest campaign. We're curious to know how many conference attendees will end up taking action thanks to that mention.
1. We'll first decide on a code to identify the conference. An abbreviated version of the name of the conference will work, so we'll use nr for Netroots in this example.
2. Next we'll use that short conference identifier to create a custom link for our conference speakers to share with their audience. The recipe for this is:
Our Campaign URL + ? + Tracking Component Name + = + Conference Code
Following the recipe, we take our campaign URL (www.changetheworld.org/takeaction) and add the other ingredients to make it a tracking-ready link:
www.changetheworld.org/takeaction?source_code=nr
3. Now that we have our custom tracking link our speakers can share it at the conference.
When the conference attendees engage with our action through that link, their submission data will include the conference code and we'll be able to know how many of them took the action.
Review your findings
Here's how to find those source tracking codes you've been collecting through your custom links.
1. Open the Submissions tab on your action.
2. Click on Export.
3. Select the Export format you want. (To get a CSV file, select 'Delimited text' and choose 'Comma' from the Delimited text format drop-down menu).
4. Leave the Column header format as it is.
5. On the Included export components list you'll see all the parts of your action that will be included in the export. All the parts you're likely to want will be selected by default, just make sure that the source tracking component is selected as well:
![]()
The source code is only associated with the first submission made on an action.
If you're using a multitab setup where multiple actions are embedded on the same page, make sure to include the 'Parent URL' component in the export.
That field will show the URL that supporters used to arrive at the web page, including the identification code at the very end when applicable.
6. If you want to export only a portion of the submission data, use the Download range options section to define which submissions you need. Otherwise, leave that section as it is to export all submissions.
7. Click the 'Download' button to complete the process. You'll receive an email shortly with a download link for the export file.
8. Once you have the file, check the 'Source code' column to see where each submission came from! (Review the 'Parent URL' column too if you embedded several actions on the same web page).
Last updated: November 28, 2023
