Each New/Mode campaign tool is what we call a webform, which is a form that can be embedded into a webpage. Each form is made up of components, those building blocks that allow your supporters to interact with your campaign - entering text, clicking buttons, and all that other good stuff.
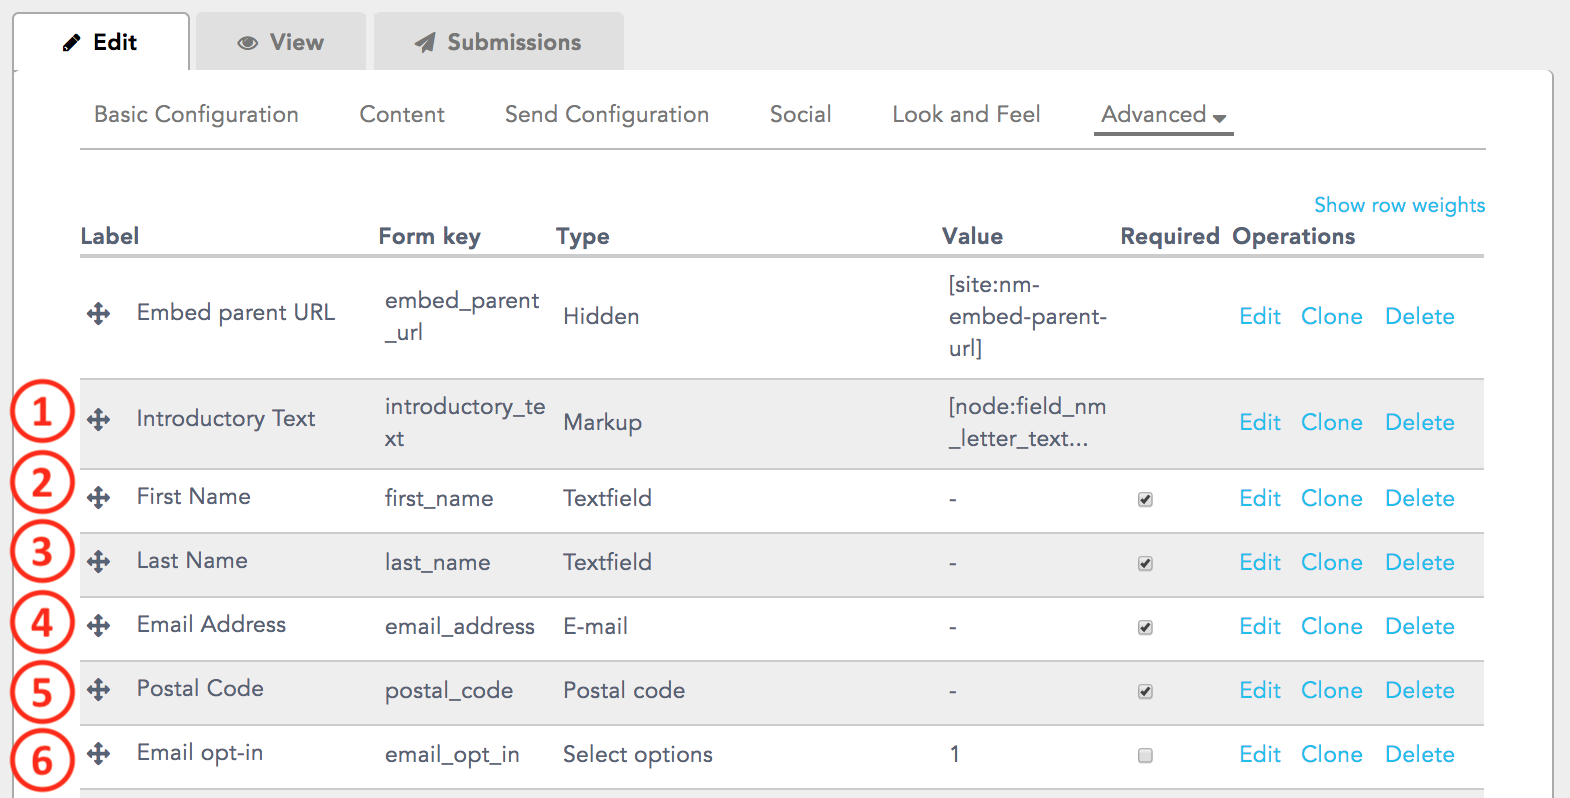
You customize these components under the Edit tab for each campaign tool, but you can also see them all listed in one place on the Components page under Advanced settings.
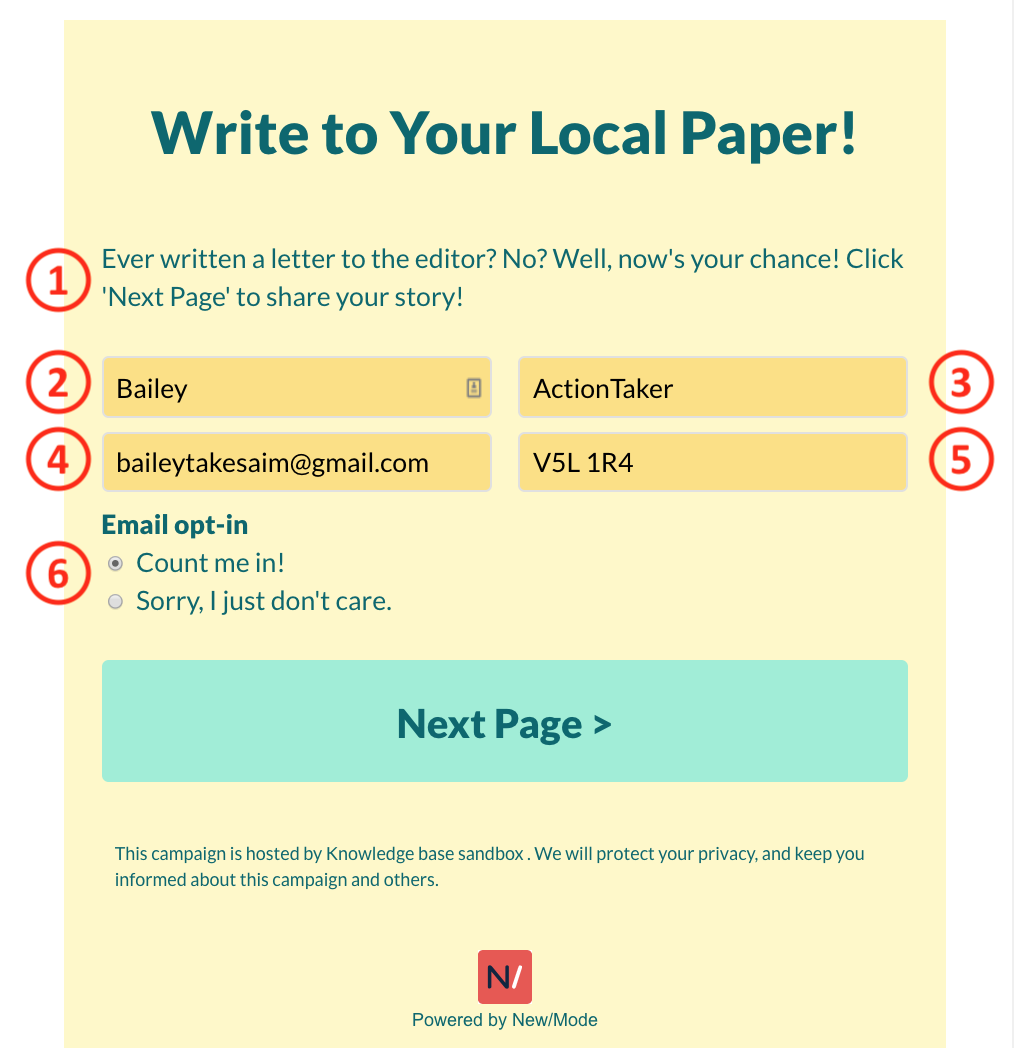
Here is a brief rundown of how the components you see listed under Advanced settings relate to what you see on the LTE tool:
- PRO TIP: On LTE Tools, the Embed parent URL, Email Address, Publications, Email Subject, and Your Letter components are all REQUIRED. The tool needs them to do its magical work, so treat them gently. Each of these components perform critical functions beyond collecting information from your supporters. Read on to understand what these functions are if you are considering making advanced changes to your tool form components.


(0) Embed parent URL: As you can see in the above image, under the component Type column, this is a Hidden component that does not appear on the tool form. It’s the URL associated with the webpage into which you’ve embedded your tool. This always updates automatically and there is no reason to edit it.
(1) Introductory Text: This is text you configure under Supporter Content on the tool Content page. It’s a Markup component which means it’s static, uneditable text that appears on the tool. If you leave it blank on the Content page, nothing will show up on the form.
(2) First Name: This is a CRITICAL field - certain functions may not work if it gets deleted. On the form, First Name is specified as a required field by default, meaning supporters must enter information into the field in order to submit the form. First Name performs two critical functions for your campaign: (1) many CRMs will not accept synced data that doesn't include a first name; (2) the default templates for LTE Tools include the first name in the From field of the emails that editors receive and in the signature in the email, and as a salutation in the thank you email.
You can choose to delete the field or make it optional for your supporters, but you will want to ensure you make the necessary changes to the email templates to account for this choice.
(3) Last Name: This is a CRITICAL field - certain functions may not work if it gets deleted. On the form, Last Name is specified as a required field by default, meaning supporters must enter information into the field in order to submit the form. Last Name performs two critical functions for your campaign: (1) many CRMs will not accept synced data that doesn't include a last name; (2) the default templates for LTE Tools include the last name in the From field of the emails that editors receive and in the signature in the email.
You can choose to delete the field or make it optional for your supporters, but you will want to ensure you make the necessary changes to the email templates to account for this choice.
(4) Email Address: This is a REQUIRED field - certain necessary functions will not work if it gets deleted. Email Address is an Email component type which means it’s tied to the success of the action. Supporters must enter a real email address for the tool to work properly, and many publications will not publish a letter if they cannot follow up with the writer!
(5) Zip/Postal Code/Street Address: This is the field where supporters enter their location information. This is a CRITICAL field - certain functions may not work if it gets deleted. You determine whether they will enter a postal/zip code or street address on the Basic Configuration page when you choose a Target Method. As a Postal Code/Address component type, this field determines our ability to target the publications in a supporter's area.
(6) Email Opt In: This component is configured on your Organization Account page under Privacy Settings. If you want to change the message or settings for a particular tool, you can go into Edit component and follow the steps to edit opt-in settings.


(00) Page 2: As you can see in the above image, Page 2 is a Page break component. It doesn't appear on the tool form but it is REQUIRED in order to create a two-page form. Do not delete it! All the components above it are located on Page 1, and all the components below will appear on Page 2. Take note of this distinction if you decide to rearrange components.
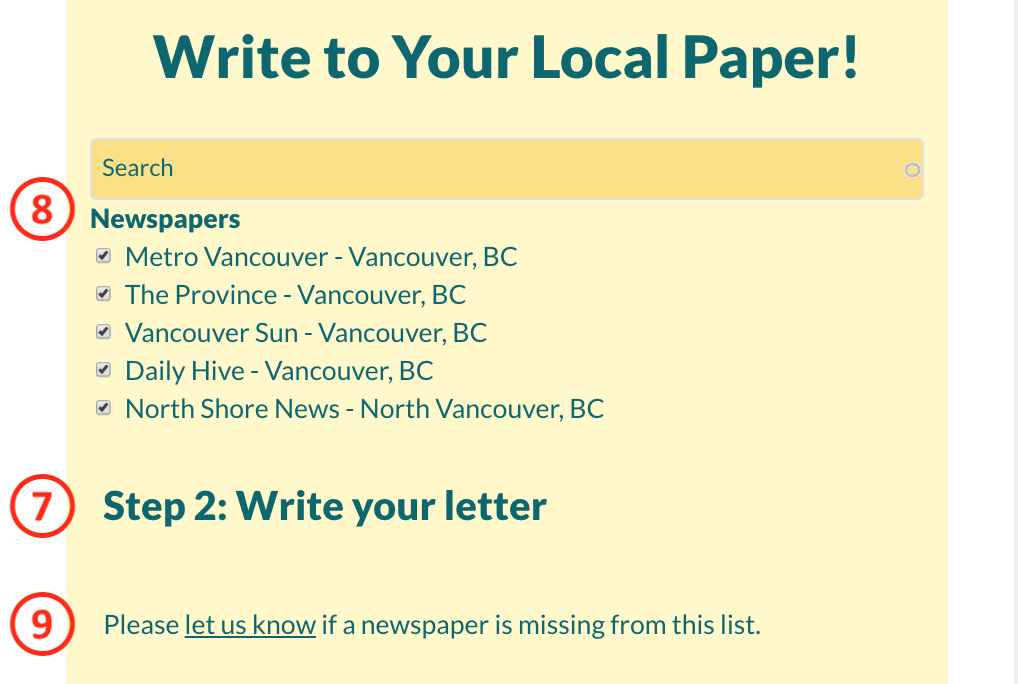
(7) Page 2 Header: At the top of Page 2, you'll see the title of your campaign, but the Page 2 Header Markup component is actually halfway down the page, and appears by default as Step 2: Write your letter. You can click the blue Edit or Delete links next to the component to change or remove this text prompt.
(8) Newspapers: This is a CRITICAL field - certain necessary functions will not work if it gets deleted. This Publications component pulls a list of relevant local publications onto the form. It also includes a search bar that can be turned on or off via the Edit link to the right of the component list (find the Provide an autocomplete search field checkbox). Under Edit Component, you can also customize the geographical area (range) that publications will be pulled from, the number of publications shown to supporters, and make the publication list invisible to supporters.
(9) Missing Newspaper: This is another Markup component, which means it shows static, uneditable text to your supporters. Our default text asks if there are any publications missing from our list and provides a link to our support email. You can click the blue Edit or Delete links next to the component to change or remove this text prompt, but we recommend keeping it!


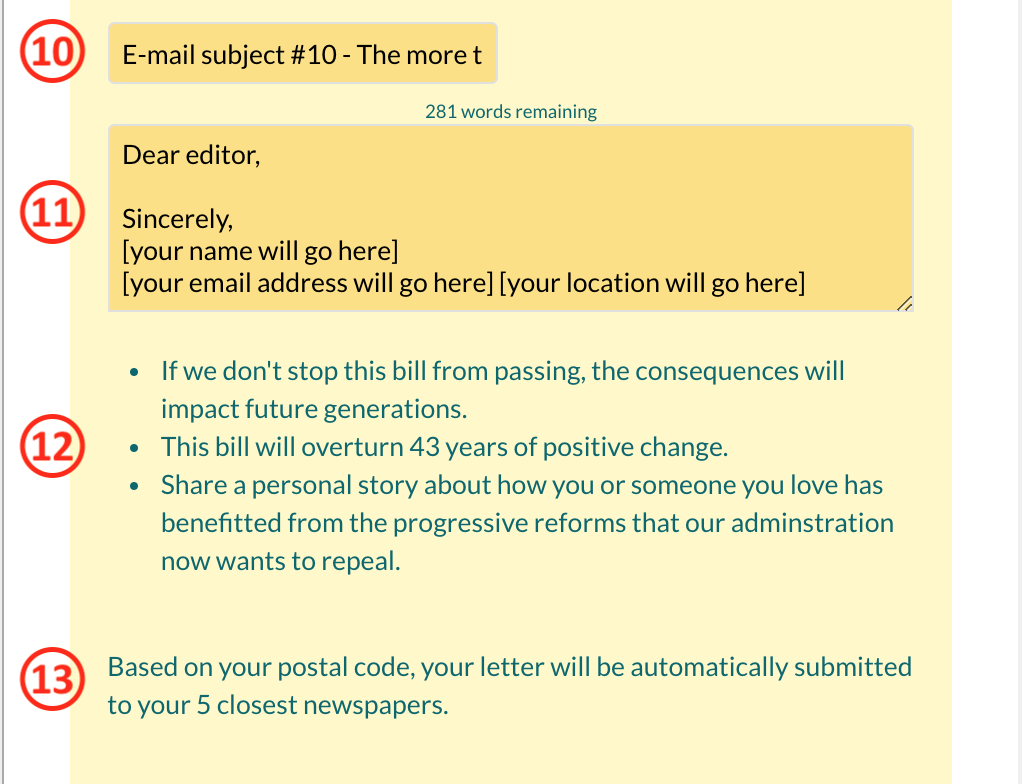
(10) Email Subject: This field is populated by the email subjects that you create under Target Content on the Content page. In letters sent by supporters, it populates the email subject line with a title randomly selected from those you've created. This is a CRITICAL field - certain functions may not work if it gets deleted. Your supporters can also create their own subject line. You can click the blue Edit link next to the component to modify these settings. For example, you may want to make this field Private so that it is not visible to your supporters, and they don't have to worry about creating their own subject line.
(11) Your Letter: This is the text box where supporters writer their letters. This is a CRITICAL field - certain functions may not work if it gets deleted. For LTE Tools, this field is usually left open to invite supporters to write their own letter. It is called a Countdown rather than Textfield because it allows for a limited number of characters, which is visible to supporters as a message located above the text box. You can customize this message and the number of characters allowed by clicking the blue Edit link next to the component.
(12) Key Points: This is text you configure under Supporter Content on the tool Content page. It’s a Markup component which means it’s static, uneditable text that appears on the tool. If you leave it blank on the Content page, nothing will show up on the form. Key Points can always be updated or edited on the Content page, but you may want to used Advanced settings to change the location of this component.
(13) Submit help text: This help text is designed to let supporters know how this campaign tool work. It is a Markup component which means it’s static, uneditable text that appears on the tool. You can edit this message by clicking the blue Edit link next to the component.
At the bottom of each page of the tool form, you'll also see action buttons, which are not listed under Components:

You can find and edit action buttons by navigating to the Content page
Using Advanced > Components
When you’re working in Advanced components, keep in mind that those all-important REQUIRED components must remain on the form (though you can reconfigure them in various ways)! Beyond these, you have tons of options for reconfiguring and customizing your campaign tool:
- Add additional components, like a supporter image or a dropdown menu.
- Edit components
- Rearrange components
- Rename buttons and labels
