Our platform supports all left-to-right languages, and this guide will help you create actions to engage your supporters who speak languages other than English.
To campaign in multiple languages you'll want to create one action in each language.
If creating additional actions for translations would put you above your plan's action limit reach out to us at support@newmode.net and we'll get you set up!
This guide covers transating all the different parts that make up an action. You can read it in order or skip right to the section you're looking for below:
Content and tokens
Form field labels and system messages
Override interface translation
Translating form field labels
Create and edit token aliases to translate user-friendly tokens
Content and tokens
The content and user-friendly tokens you use on your action are the main areas you'll need to translate.
- For the content itself, enter it into the different sections on the Content tab just as you would for an action in English.
- To translate field labels, follow the steps below.
- To translate user-friendly tokens, follow the steps below to create a custom alias for every token that your supporters will see on your action.
Form field labels and system messages
Our platform handles form field labels and system messages (the prompts that come up as supporters interact with your action - such as "Please enter a postal code to continue") automatically so that they appear in the right language.
We have translations of all of these messages in the backend, and our platform chooses which one to display based on your browser settings. So a supporter whose browser is set to Portuguese, for example, will automatically see the labels on fields and all system messages in Portuguese without you needing to provide those translations yourself. Neat!
Please note that the 'Tweet' button on tweet actions can't be edited or translated.
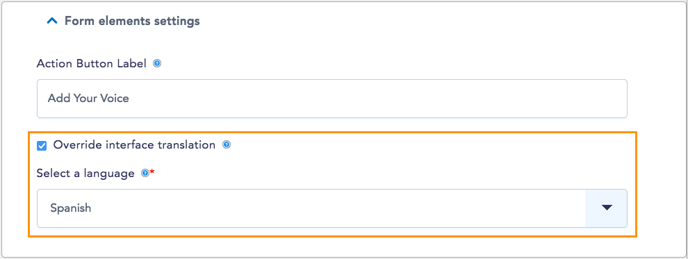
Override interface translation
You can also set your action to show system messages and form field labels in a language you choose, so that your action looks the same to all visitors regardless of the language they're using in their browsers.
- On the Content tab, scroll to the Form elements settings section.
- Check the box for 'Override interface translation'.
- Select the language for the system messages and form field labels to show in.
- Click on the 'Save & Next' button at the end of the page to save the changes.
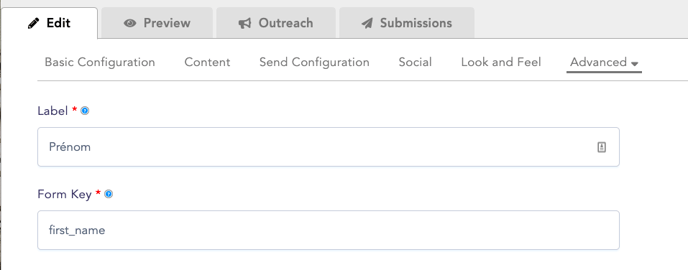
Translating form field labels
If you select 'Override interface translation,' the form field labels (such as 'First Name,' 'Address,' etc) will be translated automatically to the language you have chosen and these changes can be viewed under the 'Preview' tab.
To manually translate form field labels:
1.Under the Edit tab, click on 'Advanced' and then 'Components':

2. Find the field you'd like to translate and click 'edit'.
3. Edit the field's Label and click 'Save component' at the end of the page.
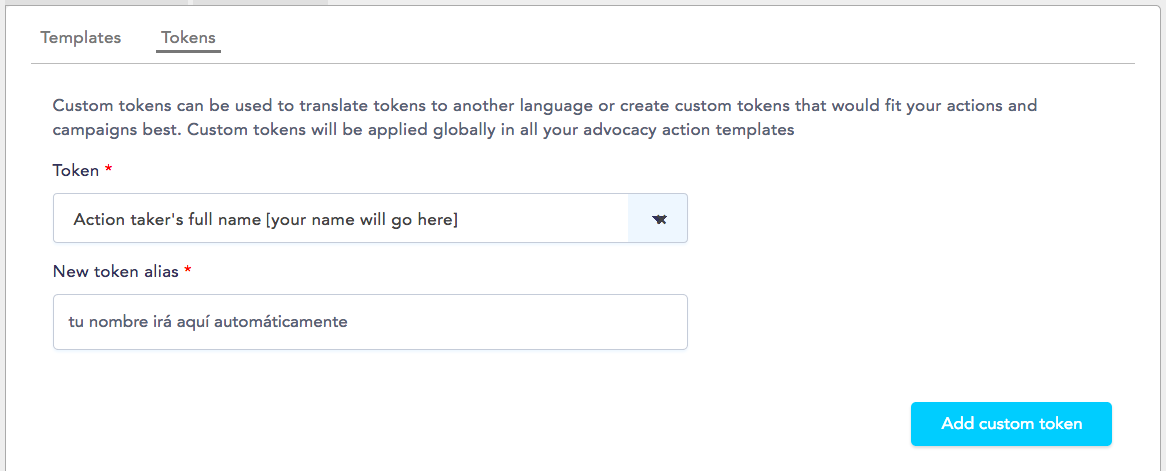
Create custom token aliases to translate user-friendly tokens
Adding a custom token alias lets you create a nickname for user-friendly tokens: one that's in the same language as the rest of your action, or one that simply fits your campaign better. You can create multiple aliases for the same user-friendly token, and once you add them they'll be available in the tokens menu.
- On your Dashboard (accessible by clicking "Dashboard" on the top right of your screen), open the Templates tab. (Note that you need administrator permissions to see this tab).
- Select 'Tokens' at the top of the page.
- From the 'Token' drop-down menu, choose the user-friendly token you want to create an alias for.
- Under 'New token alias', enter the token alias you want to use for the token you chose earlier. Use only letters! Symbols (like "/" or "+") are not supported.
- Click on the 'Add custom token' button.
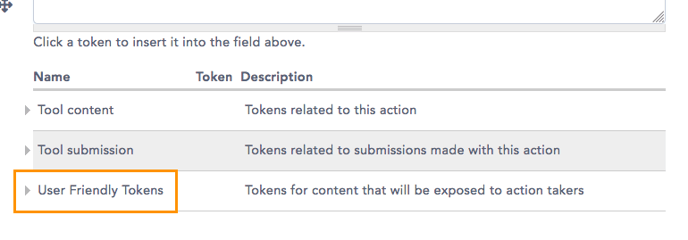
6. After creating a token alias it will get added to the tokens menu at the end of the list of User Friendly Tokens, so you'll be able to use it anywhere you can use tokens:
 Edit custom token aliases
You can review and manage the custom token aliases you've created at the bottom of the Templates > Tokens page:

You can see what default user-friendly token they call, edit them, or delete any that you won't need anymore.
If you delete a token alias it will stop working as a token, so make sure that you don't delete a token alias that's currently being used in one of your actions!
Opt-in, privacy policy statement, and New/Mode branding
Opt-in
Start by opening Advanced > Components to see a list of the components that make up your action, and look for an email opt-in component.
- If your action has an opt-in component: click on 'Edit', then scroll down to find the opt-in and opt-out messages, replace the existing messages with your translated versions, and click on 'Save component' to complete the process.

- If your action doesn't have an opt-in component: add one in a language other than English by creating an opt-in component using the blank field at the end of the list of components.
- If your action already has an opt-in but it's not on the list of Components: use the guide linked above to create a new opt-in component in the language you want, and then take the following steps below to hide the default opt-in:
1. Open the Edit tab, click on 'Look and Feel', and scroll down to the 'Tool CSS' field.
2. Enter the code below, then click the 'Save' button to complete the process:
#edit-submitted-email-opt-in {display: none}
Privacy policy statement
Like the opt-in, your privacy policy statement is generated based on your organization's 'Data and privacy settings'. And just like we did for the opt-in above, you'll want to create a new component for the translated privacy statement and then hide the preexisting statement.
- Open Advanced > Components and scroll down to the last field, which is blank and allows you to create new components.

- Create a new component of the 'Submit button' type. Call it 'Submit button' or similar, and click on 'Save component'.

- Back on the list of components, scroll all the way to the end to create a component for the privacy statement. Enter a name for it (something like 'Privacy statement' would work), set its type to Markup, and click on 'Add'.

- On the next page, enter the translated privacy statement text into the Value field.
- Click the 'Source' option to see the HTML version of the statement.
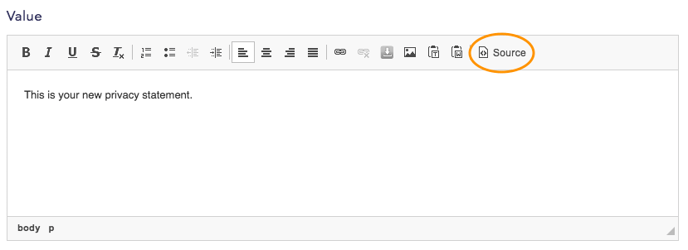
- You'll see that the statement begins with a <p> tag. Copy the code below (including the space at the beginning) and paste it between the 'p' and the '>' symbol:
id="privacy-statement"
- Your statement should now look like this:
<p id="privacy-statement">This is a privacy statement... </p>
- Click on the 'Save component' button to save the changes.
- Back on the list of components, scroll to the bottom of the list and create a new component of the 'Submit button' type. Call it 'Submit button' or similar, and click on 'Save component'.
- Open the Edit tab, click on 'Look and Feel', and scroll down to the 'Tool CSS' field.
- Copy and paste the code below (which hides the pre-existing privacy and to make the text size of the new privacy statement smaller), then click the 'Save' button:
.nm-privacy-policy {display:none}

p#privacy-statement {font-size: .65em}
New/Mode branding
Our platform will display the New/Mode branding in the footer ("Powered by New/Mode") in the right language based on the visitors' browser settings, just like it does with form field labels and system messages.
This means you don't need to create a translated version yourself (hooray!) and that can also ensure that it always shows in the language you want by overriding the interface translation.
If you'd rather remove New/Mode branding from your actions we can add this feature to your subscription for $50/month. Contact us at support@newmode.net to ask!
Last updated: July 12, 2024