This is a complete guide to syncing your New/Mode actions to NationBuilder, from creating an integration in your organization to customizing field mapping in individual actions.
Adding a NationBuilder integration to your Organization
Connecting your NationBuilder integration with an Action
Syncing the fields in your Action to NationBuilder: address
Syncing Email Opt In to NationBuilder
Additional configuration options: political capital, constant field values
Troubleshooting your integration:
Resetting a NationBuilder integration
Adding a NationBuilder integration to your Organization
1. Log into your NationBuilder account as an administrator.
2. Go to Settings > Apps > Install new app.
3. Find the NewMode app in the list and click the Install button next to it. (You might have to confirm a small popup dialog.)
4. Now you can head back over to your Organization dashboard at New/Mode, and follow the steps to Create an Integration.
5. Once you've selected NationBuilder as your CRM Service, you'll be asked to enter your NationBuilder Nation Slug. This is the first part of the URL of your NationBuilder nation, i.e. the part in front of .nationbuilder.com:
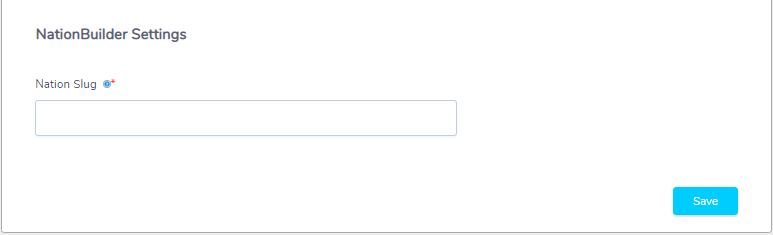
6. Click the Save button. Your Nationbuilder dashboard (or a page asking you to log in) should open in a new tab. You'll see a page asking to authorize the New/Mode integration. Select Authorize, and head back over to New/Mode.
7. After returning to New/Mode, click the Establish OAuth2 Connection tab. A message reading Success acquiring OAuth2 Access Token or OAuth2 Access Token already available should appear.
If you don't see a success message there, take a look at the Troubleshooting section.
Connecting your NationBuilder integration with an Action
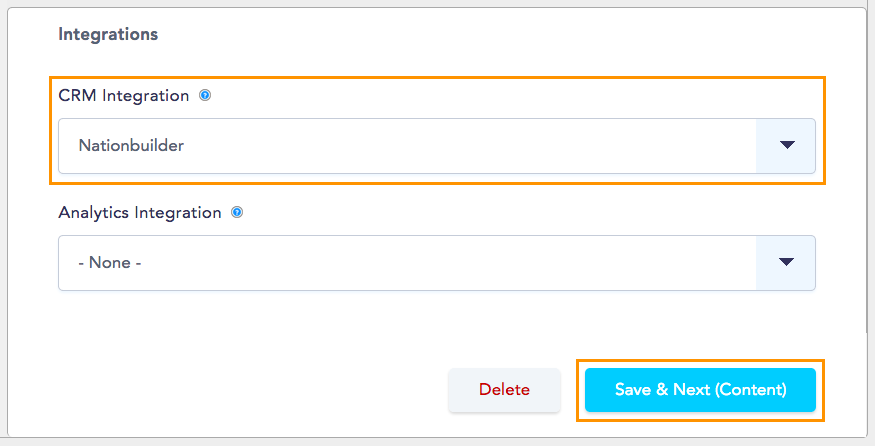
In your New/Mode action, open the Edit tab, and scroll down to the Integrations section of the Basic Configuration page. Select your NationBuilder integration from the 'CRM Integration' menu and click on 'Save & Next' to complete the process.
Syncing the fields in your Action to NationBuilder
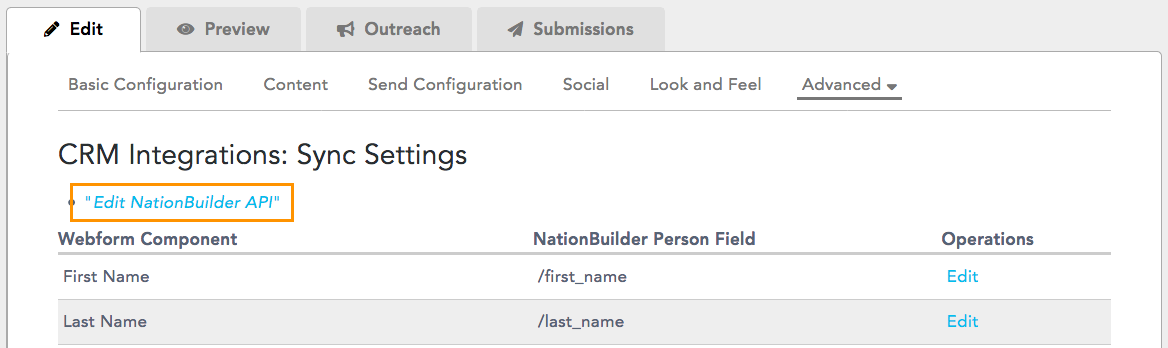
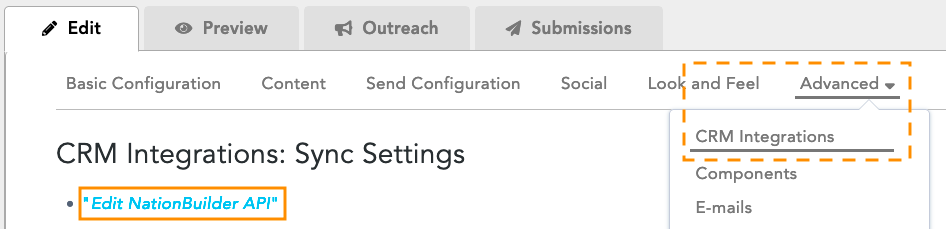
1. Start by opening Advanced > CRM Integrations to arrive at the Sync Settings page:
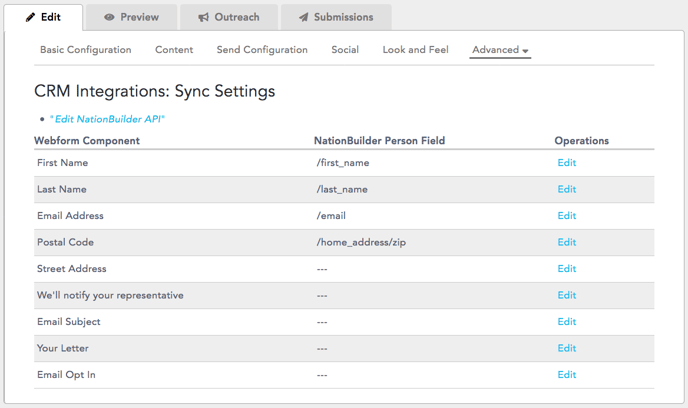
The Sync Settings page has three columns:
If any of your action fields listed on the left-side column are not pointing to the field you want on the NationBuilder field column, follow these steps:
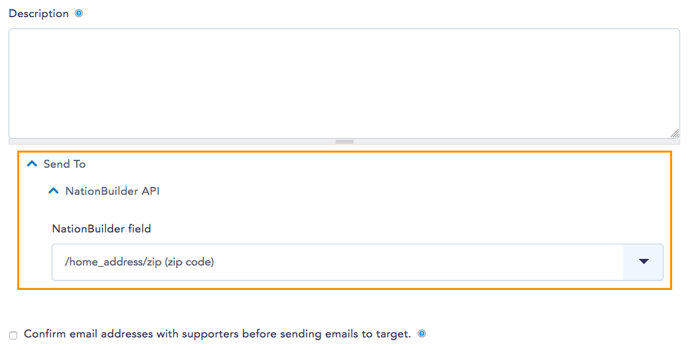
2. Click on Edit.
3. Find the NationBuilder API section and, under 'NationBuilder field', select the right user field from the drop-down menu.
4. Scroll down to the end of the page and click on the Save button to complete the process.
Syncing address data
For the Address component use the /full_address NationBuilder field:
Syncing address data
For the Address component use the /full_address NationBuilder field:
Syncing Email Opt In to NationBuilder
1. On your action, click on Advanced and select CRM Integrations.
2. On the list of fields, find Email Opt In and click on the blue Edit link. (If you don't see an opt-in field, create an opt-in componend for your action following the steps here).

3. On the Send To section, select /tags as the NationBuilder field.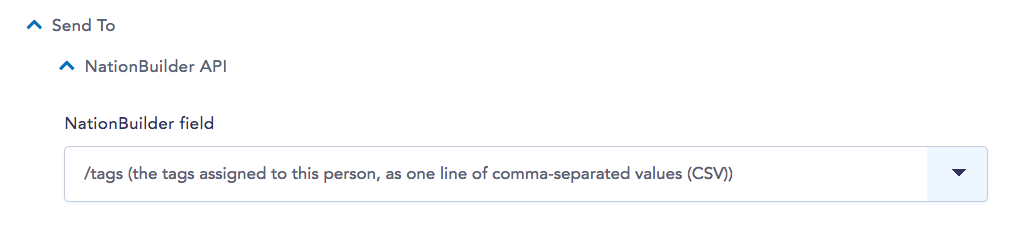
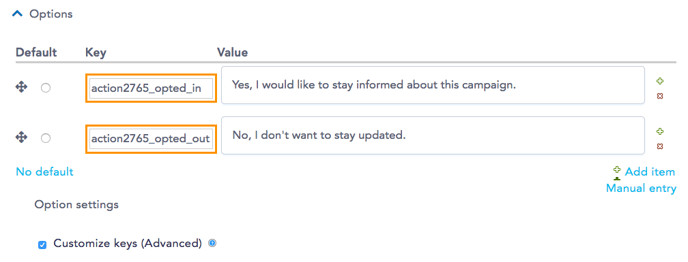
4. Under Option settings, check the box for 'Customize keys'.
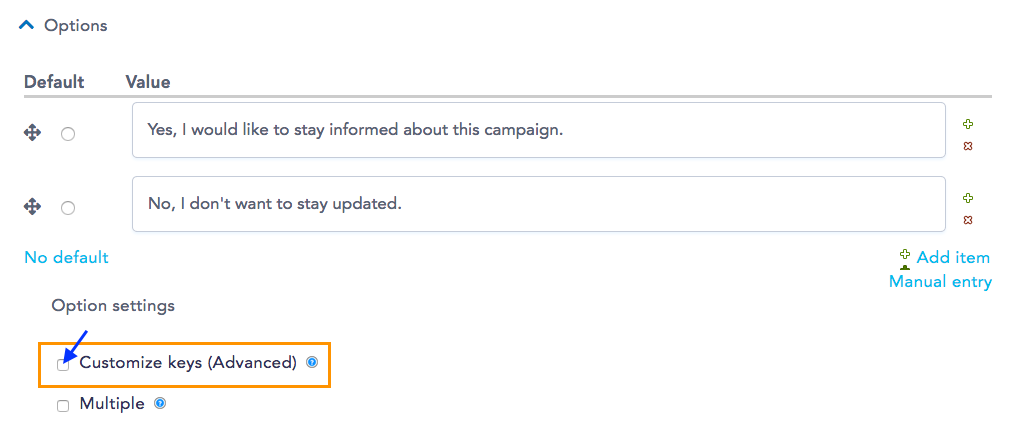
5. Now that the keys fields are visible, enter the tags you want to use for each option.
6. Click on the 'Save component' button to save the changes.
Additional configuration options
Start by opening Advanced > CRM Integrations to arrive at the Sync Settings page, then click on 'Edit NationBuilder API':
On the next page you'll see a few different optional settings:
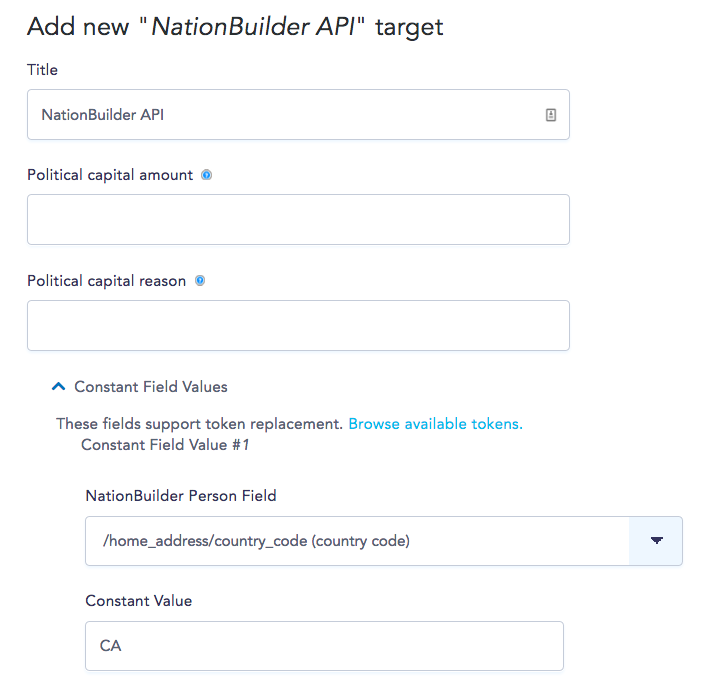
- Title: you can change the name of the integration here.
- Political capital amount: enter the amount of political capital (in cents) that will be awarded to each submission on the action. (If you don't use political capital in NationBuilder you can leave this blank).
- Political capital reason: enter the reason why the political capital you entered above was awarded. (You can leave this field blank too if you don't need it).
- Constant Field Values: these are separate fields that allow you to attach other information to your supporter data:
- On the NationBuilder Person Field drop-down menu, select the field in NationBuilder that this data should go to. (If you create custom people fields in NationBuilder you'll see it listed in this menu along with the default fields).
- Under Constant Value, enter the value that you'd like to be added to each Person and sent to the field you selected above. (You can also use tokens to send metadata from submissions to NationBuilder).
Tagging supporter data using Constant Field Values
New/Mode adds a couple of tags by default to the supporter data we sync to NationBuilder: 'newmode' and 'oce' (which stands for "one click email" and changes depending on the type of action you're using).
To send other tags, open Advanced > CRM Integrations to arrive at the Sync Settings page, then click on 'Edit NationBuilder API'.
Next, select '/tags' as the NationBuilder Person Field, and enter the tags you want to add in the Constant Value field, separated by commas. These tags will appear on your supporter's Person profile in NationBuilder..
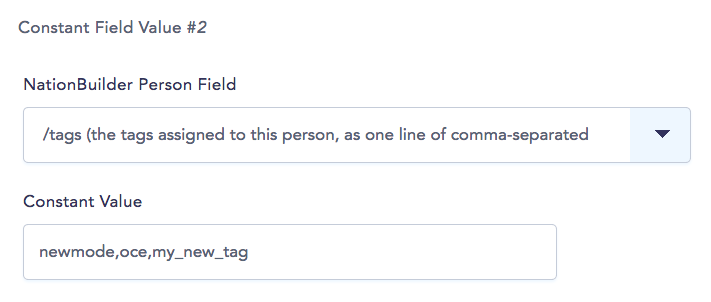
Make sure you save any changes!
Troubleshooting your NationBuilder integration
Resetting a NationBuilder integration
You need to be an Administrator in your organization to complete this process.
- In the action, open Advanced > CRM Integrations, and click on 'Edit NationBuilder API'. Take note of any settings and values there, as they'll be deleted in step 2. (Repeat this process if you have multiple actions connected to the same integration).
- In your Dashboard, open the NationBuilder integration on the list of integrations on the right side, scroll to the end of the page and use the 'Delete' button to remove the integration from the organization.
- Open a new tab in your browser and log into your Nation with an admin account. Once there, remove the New/Mode app from your Nation (Settings > Apps > Installed Apps > Uninstall New/Mode).
- Back in your New/Mode Dashboard, create a new NationBuilder integration.
- Authorize the connection between NationBuilder and New/Mode when prompted.
- Open the 'Establish OAuth2 Connection' tab on the integration to look for a success message stating that an OAuth2 token is available:

- Open your action and connect the new integration to it in Advanced > CRM Integrations or in the Basic Configuration page. The automatic syncing process will beging right away, so it's important that you complete the next step quickly.
- Open Advanced > CRM Integrations and reenter any settings and values from the first step. Make sure to do that on the 'Edit NationBuilder API' page so that the integration has the same configurations and tags it did initially.
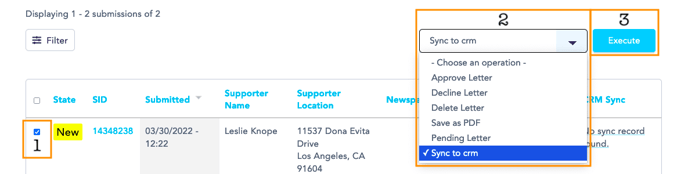
- Now that the action is connected to an integration our platform will queue all submissions to be automatically synced. On the Submissions page they'll appear as Pending at first and show as successfully synced within 5 minutes or so.
Once you've confirmed that the new integration works, repeat steps 7 and 8 for any other actions that you want to sync with NationBuilder.
If you still get sync errors with the new integration, make a support request here and we'll look into it!
Last updated: May 25, 2023