A Conditional Targeting action allows you to create different content for targeted decision-makers based on whether they support or oppose your organization's efforts.
This feature is available on the Campaign Builder, Organization, and Network plans.
Start by enabling conditional targeting, then define at least two messages (a default message and a condition with a second message). Finally, make some additions to your action to help your supporters to see the messages they'll be sending.
Enabling Conditional Targeting
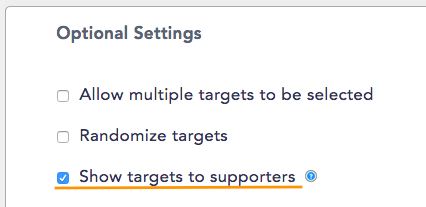
1. On the Basic Configuration section of the Edit tab, scroll down to Optional Settings and check the box for 'Show targets to supporters':
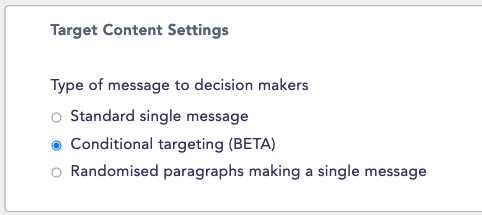
2. Now go to the Content section, and scroll down to Target Content Settings. Under the Type of message to decision makers header, select the Conditional Targeting radio button. The page will automatically update with this selection.
Defining a Default Message
Next, scroll down to the Target Content section. You'll see the Email to Targets section, whose fields can be grouped in two sections: rules and message.
Rules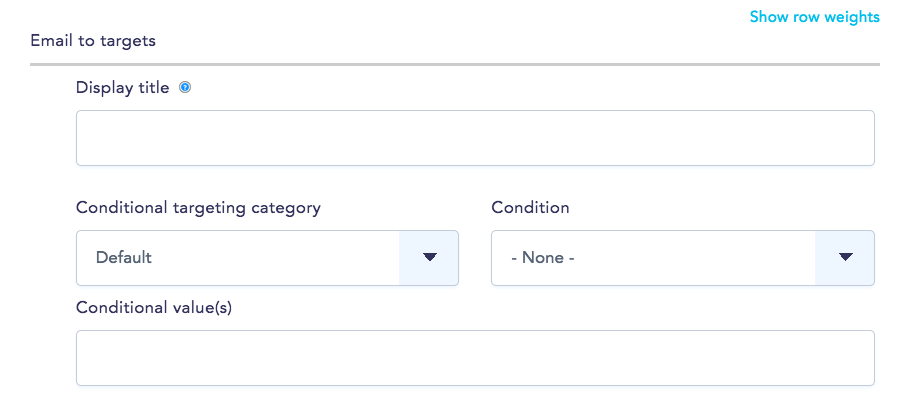
3. These fields are where you decide how your message will be displayed and who it will be sent to. Use this setup for the Default message:
- Display title: the heading that appears on the action when the action shows targets that match this conditon. This is a good way to let your supporters know where their target stands on the issue your campaign is about, or you can leave this field blank.
- Conditional targeting category: select Default to set this as the message that will go to any targets who don't meet the condition. (We'll look at the other options when we set the second condition).
- Condition: select -None-, as the Default message doesn't need a condition. (You'll get to know the other options later on!)
- Conditional value(s): leave this blank for this Default message because there's no condition.
For the Default message, set the 'Conditional targeting category' to Default, the 'Condition' to -None-, and leave the 'Conditional value(s)' field blank.
Message
The next two fields will be familiar, as they're the same fields you use on a single-message action:
- Email Subject: the subject of the email sent to targets who don't meet any conditions.
- Your message: the content of the email that will be sent to targets who don't meet conditions.
Using tokens
Conditional messaging doesn't support user-friendly tokens but you can use submission tokens. You can copy them from one of your other actions or use this article as a reference.
Note that if you compose your message as a 'Standard single message' and then switch to 'Conditional targeting' any tokens you included will be removed.
4. Enter an email subject and a message, and click the 'Add another item' button to create a second condition.

Defining a Condition
Now that you've created a default message, you can create conditions to select targets so that they receive a dedicated message instead of the default one.
Creating a condition requires matching target name, position, jurisdiction, or party with our database, so you'll want to start by making sure you know exactly how the targets you've selected will show up.
Confirming target display
5. On a new tab on your browser, open the Preview tab to see your action, then enter an address or postal code so you can see how the targets you've selected are displayed on your action.
Our targets are formatted as: Name (Position), Jurisdiction, Party
Below is a sample of four targets from three different datasets: two at the municipal level, one at the state level, and another one at the federal level:

To highlight the differences (particularly in the Jurisdiction and Party) this is how those target details would be broken down:
| Name | Position | Jurisdiction | Party |
| Brandon M. Scott | (Baltimore City Council President) | Baltimore city, MD | Democratic Party |
| Bernard C. "Jack" Young | (Baltimore Mayor) | Baltimore city, MD | Democratic Party |
| Kweisi Mfume | (Representative) | MD District 7 | Democrat |
| Frank M. Conaway, Jr. | (State Representative) | District 40 | Democratic |
6. Take note of how the targets you'll be reaching are displayed, and keep this tab open so you can reference it as you create your conditions.
7. Back on your action, you'll be looking at the same fields you used to create the Default message, only this time you'll get to go a bit deeper into the rules to select a group of targets within the larger dataset(s).
- Conditional targeting category: set the condition to be based on:
- Representative Name
- Jurisdiction
- Position, or
- Party
- Condition: select the criteria the system will use for the condition. You can select between:
- -None-: for the Default message only
- Is: to look for exact matches
- Is not: to exclude matches
- Contains: to look for partial matches
- Conditional value(s): define what the system will look for to determine if a target matches the condition and therefore should be sent this message or a different one.
What you enter here will depend on what you set on the previous field, and should be the target's name, jurisdiction, position, or party as they appear in our database.
- Whether you're using target names, jurisdictions, position, or parties, they need to match the way they're listed in our database exactly.
If you're creating conditions for a large number of targets please email us a link to your action and the names of the datasets you're using, and we'll gladly share a list of target data to ensure matching. - You can enter multiple conditional values by separating them with a comma. Make sure there are no spaces after each comma! (A quick way to remove spaces is to paste the list in Google Sheets or Excel and use Find and Replace to swap ", " (a comma followed by a space) for ",").
- If you run into the 255 character limit, create additional rules with the same email subject and message to add the remaining values.
- If the values include commas (for example, jurisdictions that combine different areas) set the Condition to Contains.
8. Define an email subject and a message to be sent to any targets that match this condition.
9. If you want to add more conditions, click the 'Add another item' button and follow steps 7 and 8 again to define another condition and message. When you're done, click the 'Save & Continue' button.
Helping your supporters see the messages
Actions that use conditional targeting don't display a message to target, as there's no fixed message to show every time. You'll want to give your supporters an idea of the message they'll be sending each group of targets, and explain that they can click on a representative's name to see the message that a specific target will receive.
10. Open Advanced > Components, and follow the steps in this guide to create a Markup (text) component.
11. In the Value field of this new component, add instructions to your supporters to let them know they can click on their representative's name to see a preview of the letter they'll be sending them.
12. In Advanced > Components, move the component you just created so that it's above the 'We'll notify your representative' component, then save the changes at the bottom of the page.
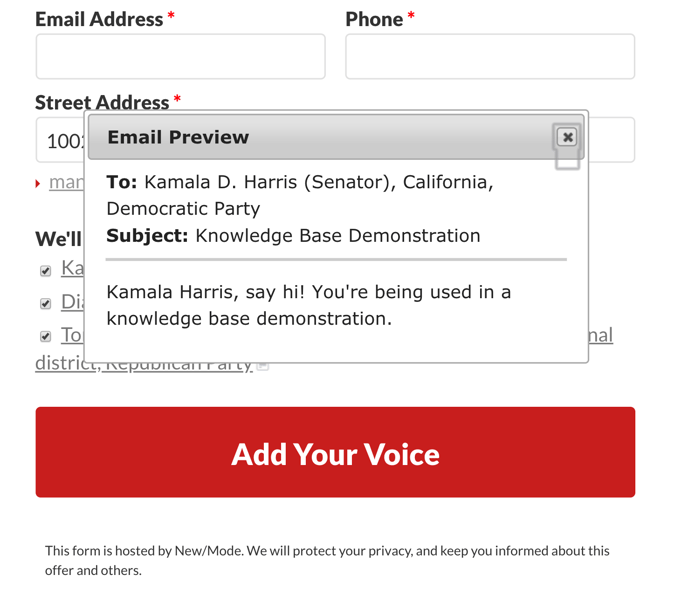
13. Open the Preview page. You will see the text you defined in step 9 instructing you to click on a target, do that to see an Email Preview. This will help you confirm that the right emails are being associated with the right targets:
14. Test your action throughly to be sure that your Conditional Targeting messages are set up the way you want them!
Learn how to deploy a Calling Action Conditional Targeting campaign here!
If you change a Conditional Targeting action back to single message it will need a bit of backend tinkering to display the letter. Reach us at support@newmode.net and we'll get it sorted for you!
Last updated: January 5, 2024