Each New/Mode campaign tool is what we call a webform, that is, a form that can be embedded into a webpage. And each form is made up of components, all those building blocks that allow your supporters to interact with your campaign - clicking buttons, making calls, and all that other good stuff.
You customize these components under the Edit tab for each campaign tool, but you can also see them all listed in one place on the Components page under Advanced settings.
Here is a brief rundown of how the components you see listed under Advanced settings relate to what you see on the tool:
PRO TIP: On One-Click Calling Tools, the Embed parent URL, Phone Number, Elected, Phone Number, Click2Call and Intro Message components are all REQUIRED. The tool needs them to survive, so treat them gently. Each of these components perform critical functions beyond collecting information from your supporters. Read on to understand what these functions are if you are considering making changes to your form components.

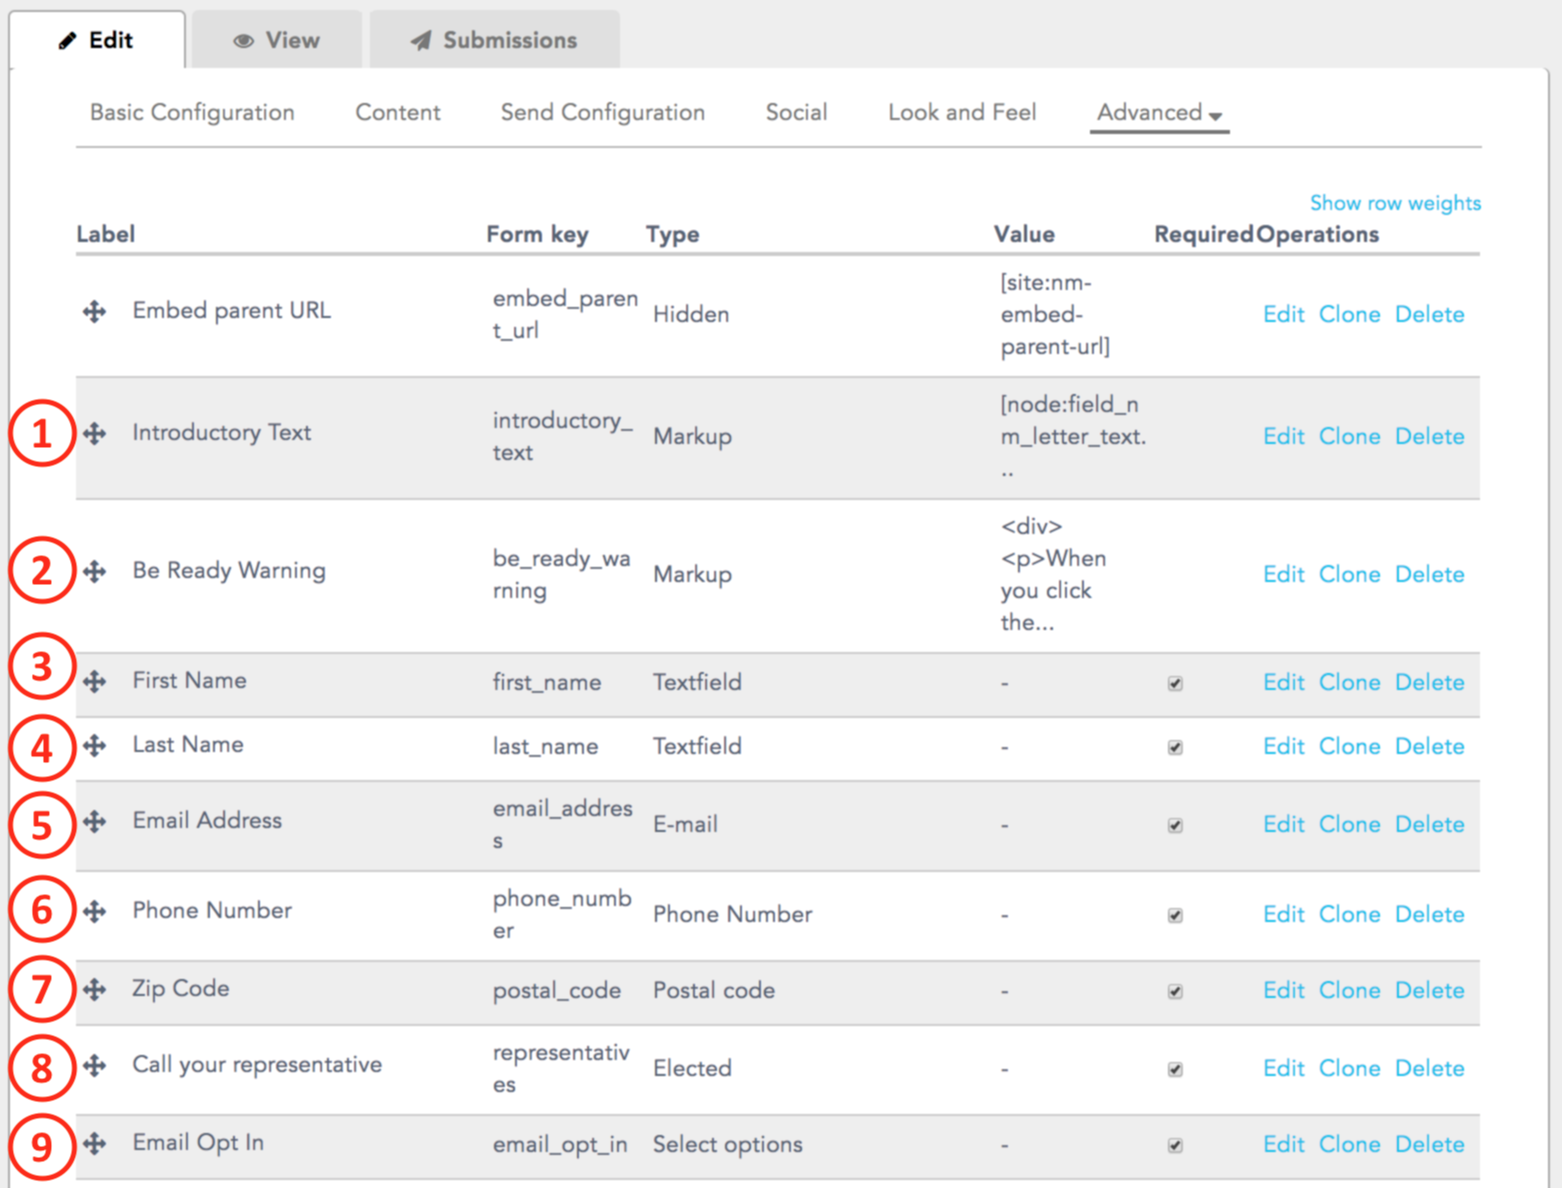
(0) Embed parent URL: As you can see in the above image, under the component Type column, this is a Hidden component that does not appear on the tool form. It’s the URL associated with the webpage into which you’ve embedded your tool. This always updates automatically and there is no reason to edit it.
(1) Introductory Text: This is the text you configure under Supporter Content on the tool Content page. It’s a Markup component which means it’s static, uneditable text that appears on the tool. If you leave it blank on the Content page, nothing will show up on the form.
(2) Be Ready Warning: This is also a Markup component, but unlike Introductory Text, it's a default message that you don't create on the tool Content page. We really like the way that this message explains to supporters what happens next. However, you can delete it, or edit the text of the message by clicking the blue Edit button to the right of the component and changing the text in the Value field on the Edit Component page.
(3) First Name: This can be a CRITICAL field - certain functions may not work if it gets deleted. On the form, First Name is specified as a required field by default, meaning supporters must enter information into the field in order to submit the form. First Name performs two critical functions for your campaign: (1) many CRMs will not accept synced data that doesn't include a first name; (2) the default templates for One-Click Calling include the first name in the salutation for the thank you email and thank you SMS.
You can choose to delete the field or make it optional for your supporters, but you will want to ensure you make the necessary changes to the email templates to account for this choice.
(4) Last Name: This can be a CRITICAL field - certain functions may not work if it gets deleted. On the form, Last Name is specified as a required field by default, meaning supporters must enter information into the field in order to submit the form. Last Name performs a critical function for your campaign in that many CRMs will not accept synced data that doesn't include a last name. You can choose to delete the field or make it optional for your supporters, but you will want to ensure that your CRM is configured to account for this choice.
(5) Email Address: On the Calling Tool, Email Address is specified as a required field by default, meaning supporters must enter information into the field in order to submit the form. We make the email address required so that the tool can send supporters a Thank You Email after they complete the action. However, you can choose to go to the Edit Component page by clicking the blue edit button to the right of the component, and un-select the Required checkbox in order to make this field optional.
(6) Phone Number: This is a REQUIRED field - this tool will not work if it gets deleted and can be broken by modifications. Phone number is tied to the success of the action because the tool will call the number your supporter enters here in order to connect them with their targeted representative. Supporters must enter a real phone number for the tool to work properly.
(7) Postal/Zip Code/Street Address: This is the field where supporters enter their location information. This is a CRITICAL field - certain functions may not work if it gets deleted. You determine whether they will enter a postal code or street address on the Basic Configuration page when you choose a Target Method. As a Postal Code/Address component type, this field determines our ability to target the representatives in a supporter's voting area.
We say this field is CRITICAL but not REQUIRED because if your tool is targeting custom targets only, and does not have any location-based lookup function, you may delete this component; but you'll lose the opportunity to collect valuable information about the locations of your supporters.
(8) Call your representative: This is the field that shows supporters who the tool is targeting. This is a REQUIRED field - certain necessary functions will not work if it gets deleted. You can configure many settings for how the list of targets will display under Optional Settings on the Basic Configuration page. This is an Elected component, meaning that it's tied to our databases of elected representatives. But don't be fooled by the name! When you select Custom Targets on the Basic Configuration page, this component will pull whatever custom targets you provide, including corporate targets. If you are targeting non-elected officials, you can easily change (or hide) the label for this component, by selecting Edit component.
(9) Email Opt In: This component is configured on your Organization Account page under Privacy Settings. If you want to change the message or settings for a particular tool, you can go into Edit component and follow the steps to edit opt-in settings.
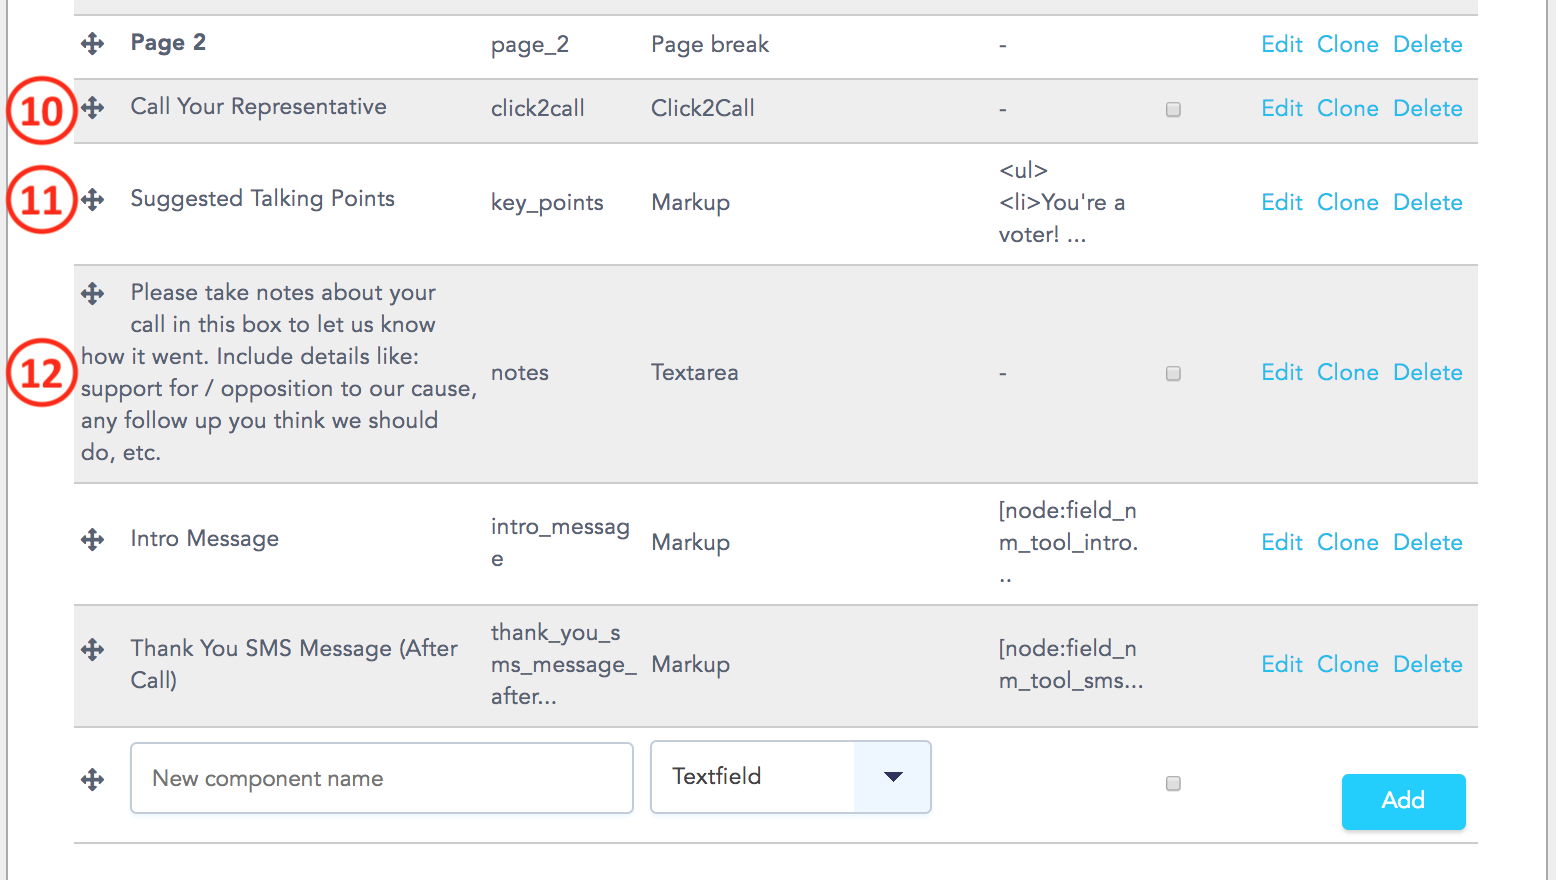
(00) Page 2: As you can see in the above image, Page 2 is a Page break component. It doesn't appear on the tool form but it is REQUIRED in order to create a two-page form. Do not delete it unless you want to switch to a 1-page Calling Tool! All the components above it are located on Page 1, and all the components below will appear on Page 2. Take note of this distinction if you decide to rearrange components.
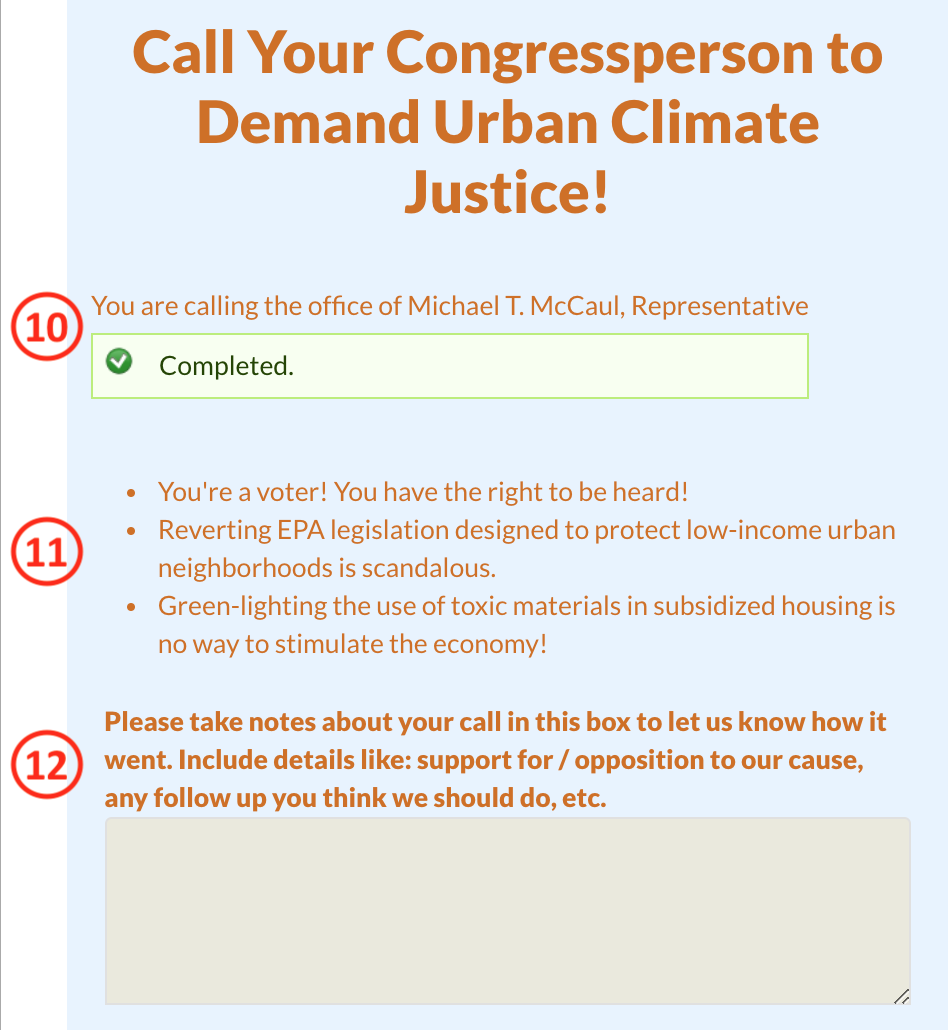
(10) Call your representative: Yup, this is your second Call your representative component. However, while the Page 1 Elected component (see above) worked to target specific reps, this Click2Call component works by calling your supporter, delivering an automated message about who they are about to connect with, and gets their phone connected with the rep's office. This is a REQUIRED field - certain necessary functions will not work if it gets deleted! You configured most of the settings for this component under your Content and Send Configuration pages. We recommend talking to a New/Mode team member before attempting to modify this component's Advanced configurations.
(11) Key Points (only for 2-page Calling Tools): This is text you configure under Supporter Content on the tool Content page. It’s a Markup component which means it’s static, uneditable text that appears on the tool. If you leave it blank on the Content page, nothing will show up on the form. Key Points can always be updated or edited on the Content page, but you may want to used Advanced settings to change the location of this component.
(12) Please take notes... (only for 2-page Calling Tools): This large text area provides a space for supporter feedback. You can edit the static prompt above the textbox and resize the text field by clicking the blue Edit link to the right of the component.
(000) Intro message: Although you don't see it on the tool form, this is a REQUIRED component that is connected to the success of the (10) Call your representative component. Do not delete it! This is the message supporters hear when they first answer their phone. You configure this message when you are customizing the introductory voice message for the calling tool. On the Edit Component page for this component, this message appears as a token. Do not modify the token!
(0000) Thank You SMS Message: Although you don't see it on the tool form, this is the component that sends a Thank You SMS to your supporters after they complete a call. You configure this message when you are customizing the Thank You SMS for the calling tool. If you do not want this tool to send an SMS, you can delete this component by clicking the blue delete link to the right of the component.
At the bottom of each page of the tool form, you'll also see action buttons, which are not listed under Components:


You can find and edit action buttons by navigating to the Content page on the Edit Tab.
Using Advanced > Components
When you’re working in Advanced components, keep in mind that those all-important REQUIRED components must remain on the form (though you can reconfigure them in various ways)! Beyond these, you have tons of options for reconfiguring and customizing your campaign tool:
- Add additional components, like a supporter image or a dropdown menu.
- Edit components
- Rearrange components
- Rename buttons and labels